The Contender library API just got a makeover ![]()
It used to take about 75 lines of code to spin up a contender spammer in your project (not including use statements). Now it takes about 13 (or 10 lines if you use TestConfig::from_file to load your own scenario file).
Here’s a rough before-and-after comparison (they’re not exactly equivalent, but close enough):
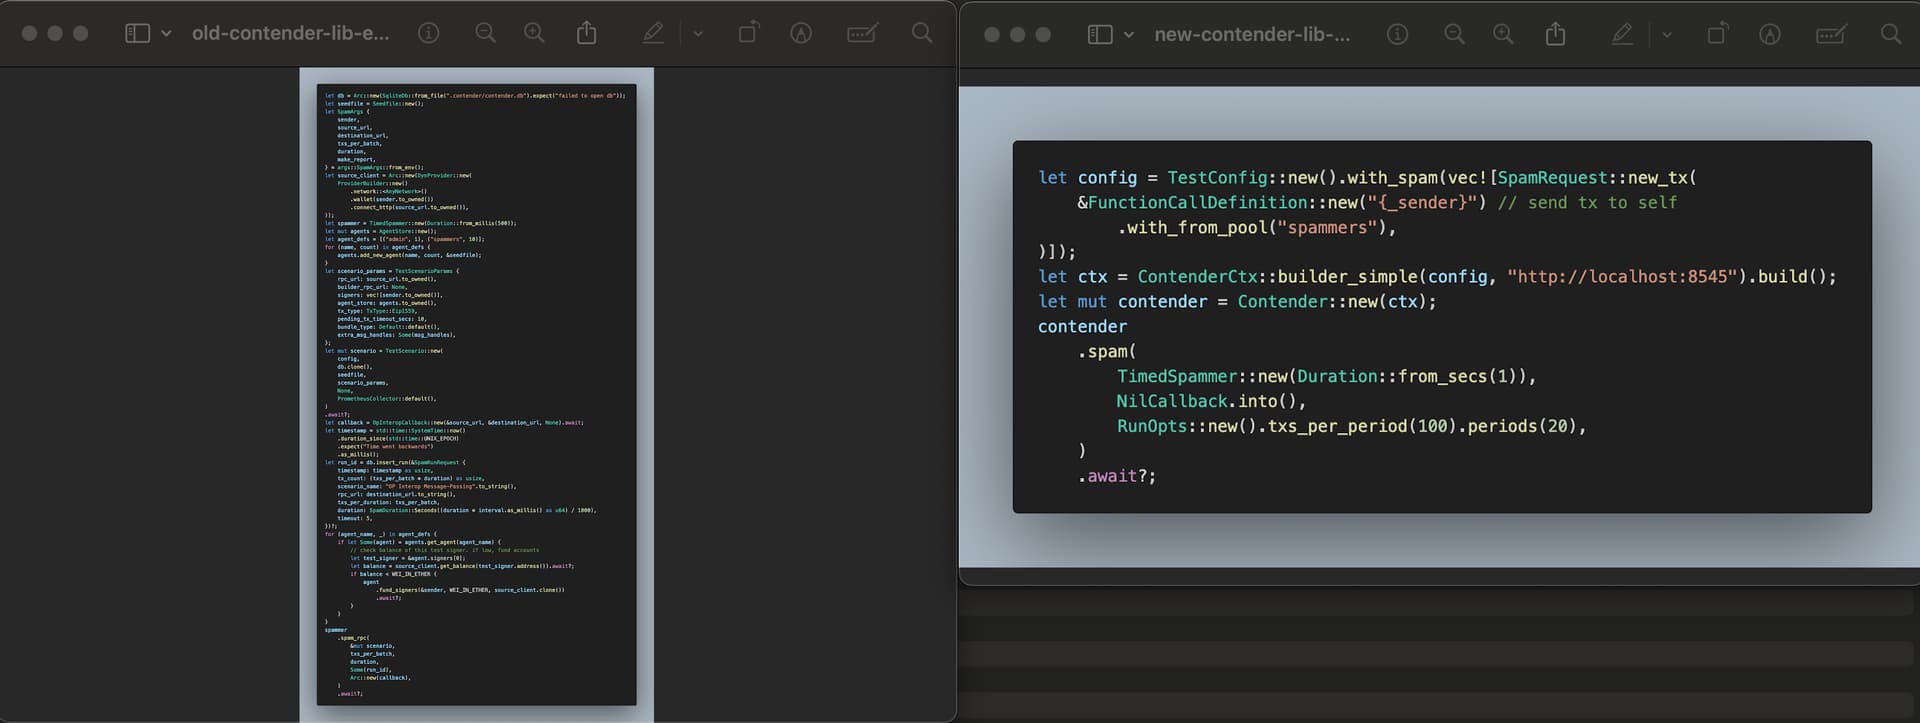
As you can see, we’ve abstracted away almost all of the configuration of a contender spammer. However, we haven’t lost any functionality. Everything is still available to configure as before — mostly in ContenderCtxBuilder, which is returned from ContenderCtx::builder_simple in this example. In the minimal example above, we don’t modify any of the default settings, so now I’ll give some examples to show how that would work.
ContenderCtx & ContenderCtxBuilder
The new API starts with ContenderCtx, which only requires a TestConfig (commonly referred to as a “scenario” in contender) and an RPC URL. Additional arguments can be applied, but we’ll cover them later. What’s important to know is that ContenderCtx defines a test scenario (contract deployments, setup txs, spam txs), and any data required to execute advanced features (e.g. an authenticated provider for using the engine_ API).
To start, here’s a baseline example, with the most minimal & default configuration possible:
let config = TestConfig::new().with_spam(vec![SpamRequest::new_tx(
    &FunctionCallDefinition::new("{_sender}") // send tx to self
        .with_from_pool("spammers"),
)]);
let ctx = ContenderCtx::builder_simple(config, "http://localhost:8545").build();
let mut contender = Contender::new(ctx);
contender
    .spam(
        TimedSpammer::new(Duration::from_secs(1)),
        NilCallback.into(),
        RunOpts::new().txs_per_period(100).periods(20),
    )
    .await?;
builder_simple instantiates a builder with a MockDb which doesn’t actually perform any DB duties (thought it acts like it does). This is convenient and useful for quick-and-dirty spammer configs, where you just want to send some simple transactions and don’t care about saving the results. We immediately call .build() on the builder, rendering a ContenderCtx which we then use to instantiate a Contender instance, which we use to execute a spam run.
A “builder” here means
ContenderCtxBuilder. It’s useful to instantiate this directly when you have a customDbOpsorSeedGeneratorimplementation that you want to provide (seeContenderCtx::builder), but otherwise you’ll probably want to useContenderCtx::builder_simple, orcontender_sqlite::ctx_builder_Xmethods to create yourContenderCtxBuilder, then call any methods you need on it (which we’ll cover in this article shortly), then immediately call.build()on that to create aContenderCtx.
An important caveat is that if we want to use create or setup steps in our TestConfig (i.e. we want to deploy contracts to spam), we can’t use ContenderCtx::builder_simple — this is because create steps store their contract addresses in the DB, and as mentioned earlier, this method produces a context with a fake DB. So if we want to use custom contracts, we need to use a real DB.
A real DB is also required to collect data for reports. More on that later.
with an actual DB
The contender_sqlite crate exposes convenient methods to construct ContenderCtxBuilders with databases:
ctx_builder_filedb— writes the DB data to a filectx_builder_memdb— only writes to memory; temporary
Here’s a snippet showing how to create a ContenderCtx with a real DB:
let ctx_builder = contender_sqlite::ctx_builder_filedb(
    config.to_owned(),
    "myContender.db",
    "http://localhost:8545",
)?;
// alternatively, use a memory-only DB:
let ctx_builder = contender_sqlite::ctx_builder_memdb(
    config.to_owned(),
    "http://localhost:8545",
);
// option-setting calls may be executed here...
// then we build our ContenderCtx with .build()
let ctx = ctx_builder.build();
Generally I recommend using
ctx_builder_memdb. This will allow you to use custom contracts and not add junk to your filesystem. More work needs to be done to include contract deployment detection to the system – currentlyContender::spamdeploys contracts exactly once; the first timeinitializeorspamis called on it; meaning if you use the sameContenderinstance to do multiple spam runs, your contracts won’t be re-deployed, but re-running your program will re-deploy them as well as re-funding your spammer accounts.
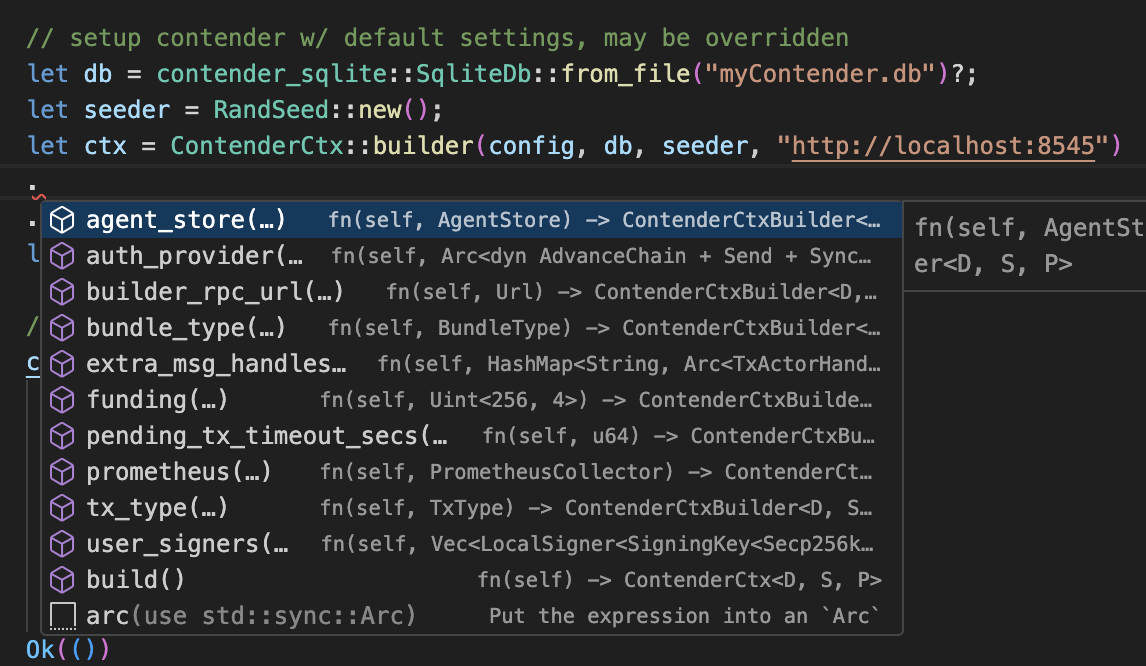
customizing your contender config
Once we have our ContenderCtxBuilder built, we can start applying custom parameters to the contender configuration. Here’s a snapshot of all the available methods:
custom funder-signer
Say for example we want to provide a custom private key to fund our agent accounts.
Contender uses the 0th entry in user_signers for this purpose, so all we have to do is call .user_signers(vec![our_key]) on our ContenderCtxBuilder. Here’s an example:
use alloy::signers::local::PrivateKeySigner;
use std::str::FromStr;
use contender_sqlite::ctx_builder_memdb;
// ...

let admin_signer = PrivateKeySigner::from_str(
    "0x8b3a350cf5c34c9194ca85829a2df0ec3153be0318b5e2d3348e872092edffba",
)
.expect("invalid private key");
let ctx = ctx_builder_memdb(config.to_owned(), "http://localhost:8545")
    .user_signers(vec![admin_signer])
    .build();
More signers can also be passed in the array; they’re used when a scenario directive (like create or spam) has a hard-coded from address rather than a from_pool declaration (which assigns agent signers).
funding agent accounts with more ether
If we’re running a scenario that requires a lot of ether, or we plan on running it for a long time, we may want to increase the amount sent to each agent account. We can use .funding(amount) for this:
use alloy_node_bindings::WEI_IN_ETHER;
// ...

let ctx = ctx_builder_memdb(config.to_owned(), "http://localhost:8545")
        .funding(WEI_IN_ETHER) // send 1 ETH to each agent account
        .build();
customizing agent accounts
In the last example, we sent 1 ETH to each agent account. By default, 10 spammer accounts are created and funded. If we don’t have a lot of ether to spare, we may want to change this by using the agent_store override.
We’ll also use the new build_agent_store function on TestConfig to generate a custom AgentStore. If you’re not familiar, AgentStore maps “agents” (defined by from_pool in scenario configs) to an array of accounts, which are funded and used to sign transactions.
// make a seeder to generate accounts;
// this may be saved and reused to regenerate the same accounts
let seeder = RandSeed::new();

// define new AgentStore with only 2 spam accounts
let agents = config.build_agent_store(
	&seeder,
	AgentSpec::default().spam_accounts(2)
);
let ctx = ctx_builder_memdb(config.to_owned(), "http://localhost:8545")
    .agent_store(agents)
    .funding(WEI_IN_ETHER) // send 1 ETH to each agent
    .build();
Here, we generate 2 spam accounts per from_pool
In the example TestConfig we made earlier, we only specify a single from_pool:
let config = TestConfig::new().with_spam(vec![SpamRequest::new_tx(
    &FunctionCallDefinition::new("{_sender}")
        .with_from_pool("spammers"), // <--HERE
)]);
so our funding step will send a total of 2 ETH.
![]() Note: if we don’t specify
Note: if we don’t specify user_signers, the 0th default key (from anvil/hardhat) will be used for funding.
more!
These examples all mostly look the same, so I’ll just quickly summarize the rest:
.auth_provider(a)
Provide an authenticated provider (contender::engine_provider::AuthProvider or any implementation of the AdvanceChain trait) to access the engine_ API on the given provider’s RPC endpoint. This is required to run block-building in contender, which is useful for testing chains that don’t have a consensus layer (CL) running, and pushing the limits of the execution-layer (EL) client without any CL constraints.
.seeder(s)
Provide a custom seed to generate “fuzz” data.
.builder_rpc_url(url)
Endpoint for “builder” nodes that expose eth_sendBundle. Required for scenarios that send bundles.
.bundle_type(b)
Override the bundle type — the default l1 sends bundles designed for eth_sendBundle, and the other option norevert encodes bundles for revert-protection-enabled flashbots bundles on rollup-boost.
.extra_msg_handles(m)
Allows users to add custom message handlers (TxActors indexed by name), which cache spam transactions as they’re being sent. This is used in conjunction with custom callbacks (which we’ll cover in the next section) to implement custom behavior that responds to txs being sent.
.pending_tx_timeout_secs(s)
How long we should wait before giving up on a transaction being included. If a transaction fails to land onchain after waiting for this duration, we send a new batch.
.prometheus(p)
Add custom overrides to capture prometheus data. This allows you to interface with prometheus directly, rather than relying on contender to process the metrics it gathers.
.tx_type(t)
Specify an alternate tx type (the default is eip1559; type-2). This is used to enable blob (eip-4844) or setCode (eip-7702) transactions, or make all the txs legacy (type-0). This may be removed in the future in favor of automatic type detection.
instantiating Contender
Once we have a ContenderCtx, all we need to do is pass it into a new Contender instance. This locks in our configuration, and exposes the method we need to send spam transactions.
let mut contender = Contender::new(ctx);
contender.spam(...).await?;
Simple enough — but to call contender.spam, we need to specify a few simple inputs. The next section covers this in detail.
Contender.spam configuration
To spam a chain, you need 3 things:
- a spammer
- a callback
RunOpts
It’s simpler than it sounds, though. Here’s an example of a simple spam call:
contender
	.spam(
	      TimedSpammer::new(Duration::from_secs(1)),
	      NilCallback.into(),
	      RunOpts::new().txs_per_period(100).periods(20),
	  )
	  .await?;
This will start a timed spammer that sends a new batch of transactions every second. The NilCallback we give it in the second arg simply does nothing in response to a spam transaction being sent. RunOpts defines how many txs we send in every batch, and how many batches we want to send.
In code they’re named
periods but I usually refer to them as “batches”.
You can copy-and-paste this, and provided you add the required use statements, it will compile and work. Also make sure to check out the demo project, which features zero-config runnable examples (as long as you spin up a node, such as anvil).
If you want to customize your spammer and/or learn about alternative configurations, read on. The following sections will break down each spam argument in detail.
Spammers
Spammers only have one job: they decide exactly when a new batch of transactions is sent. Contender exposes two spammer implementations: TimedSpammer and BlockwiseSpammer.
TimedSpammer sends new batches at fixed time intervals.
BlockwiseSpammer triggers a new batch every time it sees a new block land onchain.
Custom spammers can also be built and used as drop-in replacements for either of these two builtin implementations. One only needs to implement the Spammer trait to make their own. We won’t get into all the details here, but if you want to dive deeper and write your own spammer implementation, the source implementations (timed.rs & blockwise.rs) are good references.
Anyways, using a spammer is simple — each builtin spammer has a simple new function to construct them:
use contender_core::spammer::{BlockwiseSpammer, TimedSpammer};
use std::time::Duration;

let spammer_timed = TimedSpammer::new(Duration::from_secs(1));
let spammer_blockwise = BlockwiseSpammer::new();
Note TimedSpammer takes a Duration — this defines how long it will wait between sending each batch of transactions.
Now that we have a spammer instantiated, we have the first component needed to call contender.spam. Next, we need to choose a callback.
Callbacks
Callbacks define code that runs after a spam transaction is sent. In the contender CLI, we use LogCallback to get the transaction receipt, measure time-to-inclusion, and save the result to the DB. Contender also exposes NilCallback which simply does nothing in response to a sent transaction.
Custom callbacks can be implemented and used as well — all one needs to do is implement the traits OnTxSent + OnBatchSent. One example of this is the OP-Interop example — it defines a callback that detects cross-chain messages and relays them to their destination chain.
If you just want to send transactions and don’t care about metrics, NilCallback is the easiest option.
However, if you do want to save transaction data in your DB, you can use LogCallback, which isn’t much more complicated; it just needs an RPC provider.
I’ll omit use statements here for brevity, but you can see a fully working example in the example repo.
// assume we have config, agents already initialized
let ctx = ctx_builder_memdb(config.to_owned(), "http://localhost:8545")
    .agent_store(agents)
    .funding(WEI_IN_ETHER) // send 1 ETH
    .build();

// build a TestScenario so we can use its rpc client
let scenario = ctx.build_scenario().await?;

// now we're done borrowing `ctx`, we can give it to a `Contender` instance
let mut contender = Contender::new(ctx);

// LogCallback saves tx data to DB
let callback = LogCallback::new(scenario.rpc_client);
Now we have a new LogCallback which will save transaction info to the DB as we spam. The last thing we need to set up is the RunOpts, to control the volume & duration of the spammer run.
RunOpts configuration
This is the easiest part. You can use the default if you want, but it’s pretty conservative (10 txs per period, 1 period). Most of the time, you’ll want to set a custom rate — higher spamming rates, or longer durations, or both. We also name the scenario, so that it’s displayed on our reports (instead of the default “Unknown”).
Here’s how:
use contender_core::{
	RunOpts,
	// ...
};

let opts = RunOpts::new().txs_per_period(100).periods(20).name("SimpleSample");
We’ve assigned a simple configuration to opts that will send 100 txs in every batch, for 20 batches/periods. If we use a TimedSpammer this translates to 100 TPS for 20 seconds.
Now that we have the final piece, let’s put it all together:
Full Example
use contender_core::{
    Contender, RunOpts,
    alloy::{
        network::AnyNetwork,
        node_bindings::WEI_IN_ETHER,
        providers::{DynProvider, ProviderBuilder},
    },
    generator::{
        FunctionCallDefinition, RandSeed,
        agent_pools::{AgentPools, AgentSpec},
        types::SpamRequest,
    },
    spammer::{LogCallback, TimedSpammer},
};
use contender_sqlite::ctx_builder_filedb;
use contender_testfile::TestConfig;
use std::time::Duration;

#[tokio::main]
async fn main() -> Result<(), Box<dyn std::error::Error>> {
		// enable contender logs
    contender_core::util::init_core_tracing(None);

    // setup test scenario
    let config = TestConfig::new().with_spam(vec![SpamRequest::new_tx(
        &FunctionCallDefinition::new("{_sender}") // send tx to self
            .with_from_pool("spammers"),
    )]);

    // setup contender context
    let seeder = RandSeed::new();
    let agents = config.build_agent_store(&seeder, AgentSpec::default().spam_accounts(2));
    let ctx = ctx_builder_filedb(
		    config.to_owned(),
		    "myContender.db",
		    "http://localhost:8545"
		)
    .agent_store(agents)
    .funding(WEI_IN_ETHER) // send 1 ETH
    .build();
    let scenario = ctx.build_scenario().await?;
    let mut contender = Contender::new(ctx);

    // LogCallback saves tx data to DB
    let callback = LogCallback::new(scenario.rpc_client);

    // run spammer
    contender
        .spam(
            TimedSpammer::new(Duration::from_secs(1)),
            callback.into(),
            RunOpts::new()
	            .txs_per_period(100)
	            .periods(20)
	            .name("SimpleSample"),
        )
        .await?;

    Ok(())
}
Here we have a spammer that saves transaction inclusion data to the DB, which can be used to generate chain reports after spamming.
BONUS: Generating Reports
To generate reports from your contender DB, you’ll need to add the contender_report crate, then call the report function:
// ...

// ADD this line before creating `contender` (Contender consumes `ctx`)
let scenario = ctx.build_scenario().await?;
// run spam, etc...

// run a report over the last spam run
contender_report::command::report(None, 0, &*scenario.db, "./reports").await?;
The first param in report is the run ID. If set to None this param defaults to the most recent run in the DB.
The second param specifies how many runs preceding the target run (the first param) to include in the report.
Third, we pass a reference to the DB from scenario, so that we don’t have to clone db ourselves; we just have to dereference it first because it lives in an Arc.
Lastly, the fourth param tells contender where to save the results; we specify a local directory ./reports.
Now when you run this, you should see contender spamming for however long you set your spammer (this example uses 20 seconds), then it will generate a report and render it in your web browser.
Clone and run the demo repo to get a jumpstart on creating your own custom spammers, and DM me if you come up with something new!
I hope these new changes make it easy to add contender spammers to your project! If you have an idea to make contender even better, please write an issue! All skill levels and contributions are welcome ![]()
Resources
- contender
- spammer examples
- op-interop-contender (a more advanced implementation)