TL;DR:
In this post, we present our experiment of running Flashbots Rbuilder in Intel TDX, which we demo-ed at TEE.Salon in Brussels. Rbuilder is an Ethereum block builder written in Rust, focused on performance, modularity, and contributor friendliness. Using Rbuilder in a TDX confidential virtual machine offers several benefits, which we’ll explain below. The main goal is to allow users to verify the integrity of core block building and refund logic through remote attestation. Additionally, this post includes a detailed deployment process and step-by-step guide for those interested in reproducing our experiment or implementing similar setups.
Intel TDX:
If you’re familiar with TEEs and confidential virtual machines, you can skip this section. Otherwise, consider it a quick refresher.
Intel Trust Domain Extensions (TDX) is Intel’s SGX successor within the TEE family. Its target is isolation at the virtual machine (VM) level. The Trusted Computing Base (TCB) is expanded to include the application and the guest OS, but the host and hypervisor remain outside the trust model.
On the plus side, it offers “near” native performance depending on the workload type and is more user/developer-friendly, as you don’t need to modify your code for TEE awareness.
Both Microsoft Azure and Google Cloud Platform have recently extended their TEE offerings with Intel TDX confidential virtual machines. Additionally, OVHcloud has added Intel TDX bare-metal machines to their recent lineup.

Source: Edgeless constellation
For more in-depth details, I recommend Intel TDX Deep Dive and Intel TDX documentation.
Yocto & Rbuilder:
As previously shown, Intel TDX expanded the Trusted Computing Base (TCB) to include the entire VM, such as the guest OS and applications running in it. To increase security, we need to reduce the TCB as much as possible to minimize the attack surface, ideally down to the application, CPU package, and a customized kernel for a minimal Confidential Virtual Machine (CVM).
There are likely many approaches to experiment with, such as unikernels, microkernels, embedded Linux kernels, and custom-built ones. However, we also need a way to build the minimal CVM reproducibly to ensure the same measurement for attestation. Therefore, we decided to use Yocto. It is an open-source project that enables developers to build customized Linux-based systems tailored to their specific purposes. Many organizations participate in the continuous development of the Yocto Project. You can tailor your VM in Yocto by using existing layers (usually prefixed with meta-) or by creating your own custom layers. Each of these meta layers can be added in different priority orders and can override or append to the previous ones.
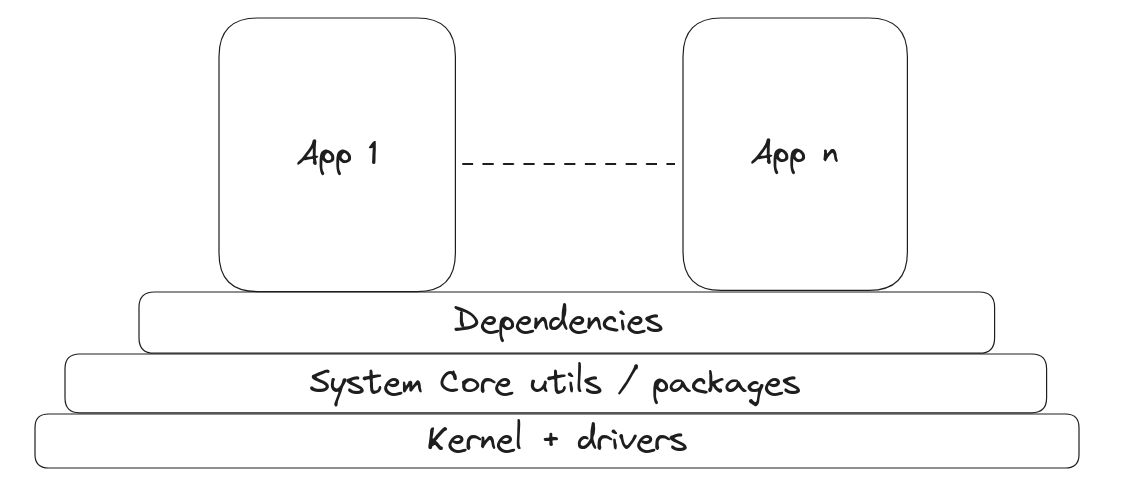
This figure shows an abstract overview of the layers in a minimal Yocto confidential image.
Each layer in the figure above can be customized and configured to meet the necessary requirements. In our case, we built and configured each part of these layers and provided a manifest to automate the building process. For the base minimal TDX VM image, we use the meta-confidential-compute layer, which contains the kernel configuration, drivers, and necessary system utilities and dependencies. The kernel configuration and drivers are stripped down to the minimum and include necessary configurations for security mitigations (e.g., Spectre and Meltdown). Other system dependencies are selected to target a minimalistic build, such as using SysVinit instead of Systemd. Core dependencies for disk encryption using TPMv2 are also added, as well as a reverse proxy server for RA-TLS purposes using Constellation’s attestation.
The upper layers are the applications that need to run in the image. Our upper layer is meta-evm and it contains recipes to build the applications and put their binaries into the final image. These binaries include our public Rbuilder, a Reth node, a config parser for Cloud Init to fetch setup configs upon booting, and optional tools to fetch a snapshot of Reth state from R2 Cloudflare storage using rclone.
All the mentioned dependencies and binaries are added to the final CVM’s initramfs. Thus, any modification of the layers or dependencies results in a completely different measurement for TDX attestation. Furthermore, the final image is specifically tailored for the built-in application and won’t be bloated with various processes and apps, unlike a full-scale Linux distribution (e.g., an Ubuntu image). In other words, this setup should be less prone to interruptions and context switches by other tenant processes in the same VM, potentially leading to better performance depending on the current workload. Intel recently released a performance analysis document with recommendations on tuning the host and guest VMs to optimize performance, such as vCPU, IOthread, memory, vhost, and interrupt pinning.
Deployment Process:
Let’s briefly review the deployment process from the perspectives of both the user and the deployer.
Deployer point of view:
- Build the image containing the open-sourced Rust builder (Rbuilder) and Reth.
- Deploy the image on a ECedv or DCeds confidential virtual machine instance from Microsoft Azure.
- As of this post, we use Azure’s CVMs because of their geo-distributed offering, ability to utilize their attestation process, and Azure’s data center execution assurance. However, we hope more cloud providers (GCP, AWS) will offer TDX in the future. We are also considering bare-metal deployments.
- Share the CVM’s IP and the reverse proxy port for users to establish an attested connection with.
- Anyone can audit the image and verify that the correct one was deployed.
User point of view:
- Build the reproducible image locally to generate the measurements for attestation. While full reproducibility is the goal, Reth & Rbuilder do not build reproducibly currently and we are working on it.
- Run the reverse proxy client using the CVM’s public IP, the open port for attestation, and the expected measurement of the image.
- Now, the user can trigger a remote attestation and establish a trusted RA-TLS channel upon successful validation of the remote measurement.
Benefits:
- Integrity guarantee of the core block building and refund logic through verifiable attestation.
- Enhanced security due to a smaller TCB and reduced attack surface.
- Easier to audit because each layer serves a specific purpose and can be audited separately.
- Reproducible builds is one of Yocto’s features upon defining well-structured layers and recipes. This can be verified by checking the image’s measurements using Constellation’s measured-boot script. Note: This might be impacted by some artifacts, such as mismatching libraries, nondeterministic ordering of symbols or when the compiler doesn’t support reproducible builds.
- Confidentiality guarantees, e.g., for transactions’ execution or having a true private mempool.
- Friendlier DevEx compared to SGX because no code refactoring is necessary to make it TEE aware. You just need to provide a way to build your application in a reproducible manner.
- First stepping stone towards permission-less distributed block building.
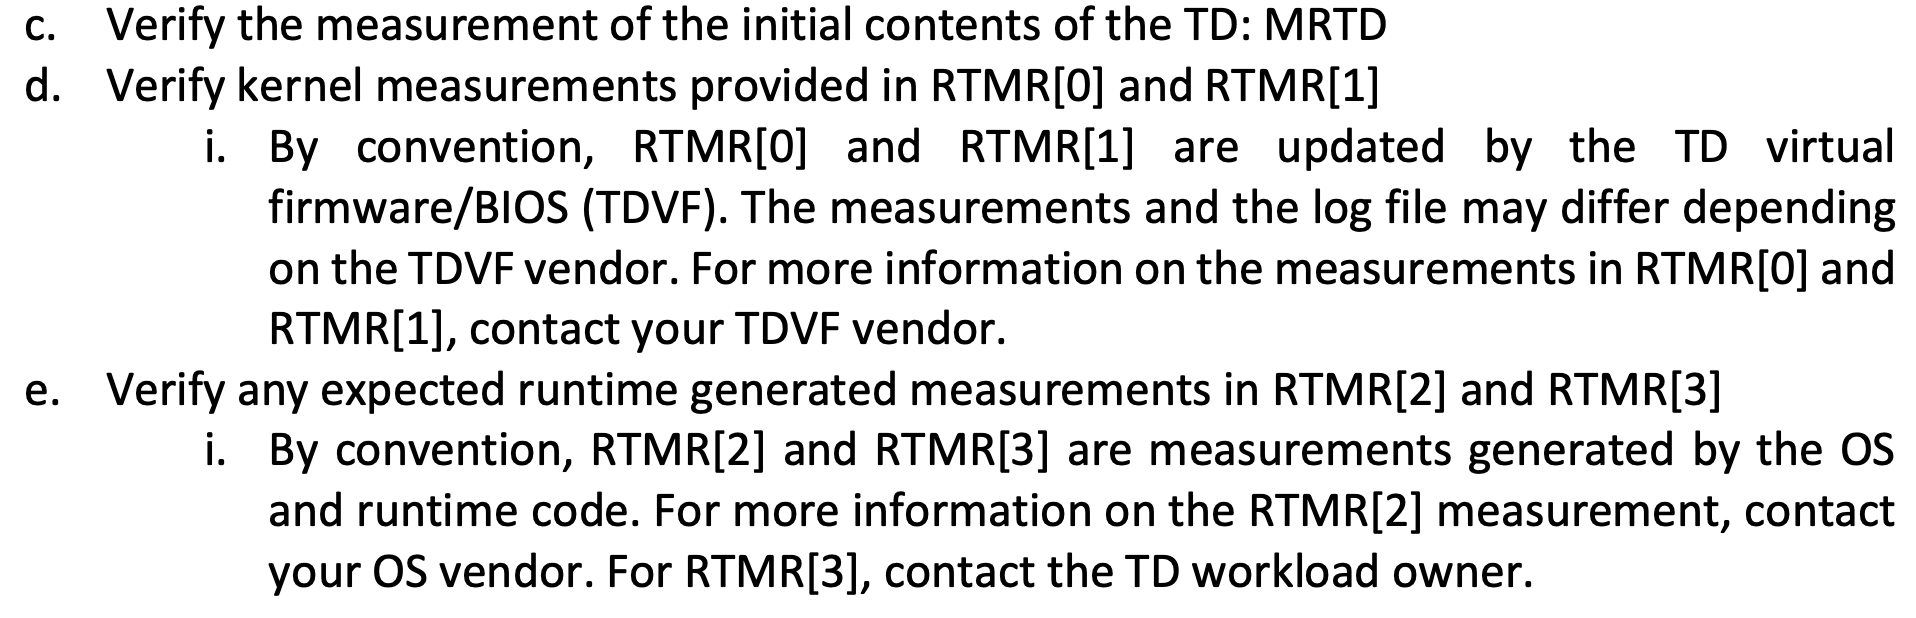
Limitations and Future Work
- Upgrades such as bug fixes or new features are difficult in TEE deployments. They require rebuilding the image because any change to the stack and applications affects the final measurement. Since everything is part of the initramfs measured in TDXs RTMR[0-3], the new image must replace the old one, and disk access from previous versions is restricted. Additionally, a new deployment should be announced so users can reproduce the new measurements for attestation.
- Chain of Trust now includes the CSP (Azure) because some measurements are not reproducible due to the proprietary firmware used. Similar to SGX, the manufacturer (Intel) is part of the chain of trust. However, we (Flashbots) are not part of the chain of trust anymore since we open-sourced the builder and provided tools to reproduce the built image. This allows anyone to audit the result and generate measurements locally for remote attestation and verification.
- TDX Bare-metal Deployments are feasible with these yocto images. However, we still need to implement TDX quote generation within these minimal VM images. Additionally, we need a data center execution assurance similar to Azure’s. These are works in progress, and we can consider bare-metal deployment once attestation and reproducible measurement generation are finalized.
Step-by-Step Reproduction Process
The following is a high-level guide from building the image to its deployment and attestation.
Building the image:
- Clone the yocto-manifest repo and check out the tdx-rbuilder branch.
- Inspect the
yocto_build_config.envfile and select the configuration for your image. The current options include:DEBUG_TWEAKS_ENABLED=<0|1>: Enable or disable debugging mode for the generated image, allowing root logins.INCLUDE_RCLONE=<0|1>: Enable or disable the inclusion of the rclone binary in the final image.CLOUD_INIT_CONFIG_URL=<cloud-init-endpoint>: Specify the cloud-init endpoint for theconfig.jsonfile. For example, on Azure, it ishttp://169.254.169.254/metadata/instance/compute/userData?api-version=2021-01-01&format=text.
- Once configured, run
make azure-image. This process can take some time, depending on your machine’s resources. When finished, the build artifacts are extracted and copied to theyocto-manifests/reproducible-build/artifactsdirectory.
Note: To execute without sudo, add your user to the docker group.
Deployment:
Now that you have the image, it’s time to deploy it. We will deploy on Azure using the deploy script we have here or by following Azure’s guide. Using our script requires these steps:
- Install Azure CLI and log in with an account that has credits to launch CVMs.
- Clone this repo.
- Run the deploy script as follows:
./deploy.sh <image.wic.vhd> <VM name> <region> <instance type> <jump host IP> <config.json>.<image.wic.vhd>: the path to the generated image<VM name>: arbitrary name for the Azure VM to identify it<region>: e.g., westeurope<instance type>: e.g., Standard_EC48eds_v5<jump host IP>: You can define a jump host IP, like “13.92.115.28,” to set restrictions such as load balancing or DDOS prevention.<config.json>: path to the cloud init config.json that contains the user data loaded upon booting the image.
The config.json is parsed for only a specific set of allowed “optional” keys, which currently look like this.
{
  "JWT_SECRET": "JWT SECRET KEY",
  "RELAY_SECRET_KEY": "RELAY SECRET KEY",
  "OPTIMISTIC_RELAY_SECRET_KEY" : "OPTIMISTIC MODE US RELAY SECRET KEY",
  "COINBASE_SECRET_KEY": "COINBASE SECRET KEY",
  "CL_NODE_URL": "IP(s) of CL nodes (lighthouse). It can be a set of IPs separated by a comma",
  "AWS_ACCESS_KEY_ID": "AWS ACCESS KEY for the remote storage where the state snapshot is",
  "AWS_SECRET_ACCESS_KEY": "AWS SECRET ACCESS KEY",
  "RCLONE_S3_ENDPOINT": "R2 Cloudflare remote storage endpoint where the snapshot is located"
}
Extra: The build artifacts also include .qcow2 images, which can be deployed locally with QEMU for debugging and testing purposes. QEMU can also be used for deployments on bare-metal with TDX. TDX canonical provides an example of how to deploy such images on bare-metal machines.
Measurement generation:
- The script that generates the measurement requires some Yocto-related tools (e.g., wic). Ensure they are accessible beforehand. Change to the Yocto Poky directory and run this command:
source oe-init-build-env - Next, clone the measured-boot repo and build it with
go build -o measured-boot. - Run the script on the previously generated .wic.vhd image and provide a name for the measurement output file:
./measured-boot cvm-image-tdx-rootfs.<date>.wic.vhd output.json - The output.json file now contains all the necessary measurement data for the attestation. First, extract the measurement block from the json file by running this command:
jq '.measurements' output.json > measurements.json
Remote Attestation:
Now that we have extracted the measurements.json, follow these steps to perform remote attestation with the deployed image on Azure:
- Clone the cvm-reverse-proxy repo and run it using the previously extracted measurements.json file like this:
go run ./cvm-reverse-proxy.go -client -listen-port 8080 -target-domain https://<VM Public IP> -target-port 8745 -measurements ./measurements.json
This will run the client proxy, which listens on port 8080 and uses the server reverse proxy on the deployed image as a target, e.g.,https://13.95.117.133:8745. It marshals the measurements.json to use during attestation validation. - To trigger a remote attestation, open a new terminal and run this command:
curl http://127.0.0.1:8080
You will see on the terminal where the client proxy is running that a remote attestation is initiated and the returned result indicates whether it was successfully validated or if invalid differences with the expected measurements were detected.
Links & references:
- GitHub - flashbots/rbuilder: rbuilder is a blazingly fast, state of the art Ethereum MEV-Boost block builder written in Rust
- The Yocto Project ® 5.0.2 documentation
- https://www.intel.com/content/www/us/en/developer/tools/trust-domain-extensions/overview.html
- https://www.intel.com/content/www/us/en/developer/articles/technical/trust-domain-extensions-on-4th-gen-xeon-processors.html
- Attestation | Constellation
- GitHub - flashbots/yocto-manifests at tdx-rbuilder
- Virtual TPMs in Azure confidential VMs | Microsoft Learn
- GitHub - canonical/tdx: Intel confidential computing - TDX
- https://www.youtube.com/watch?v=sSS_Rw0d6lk